
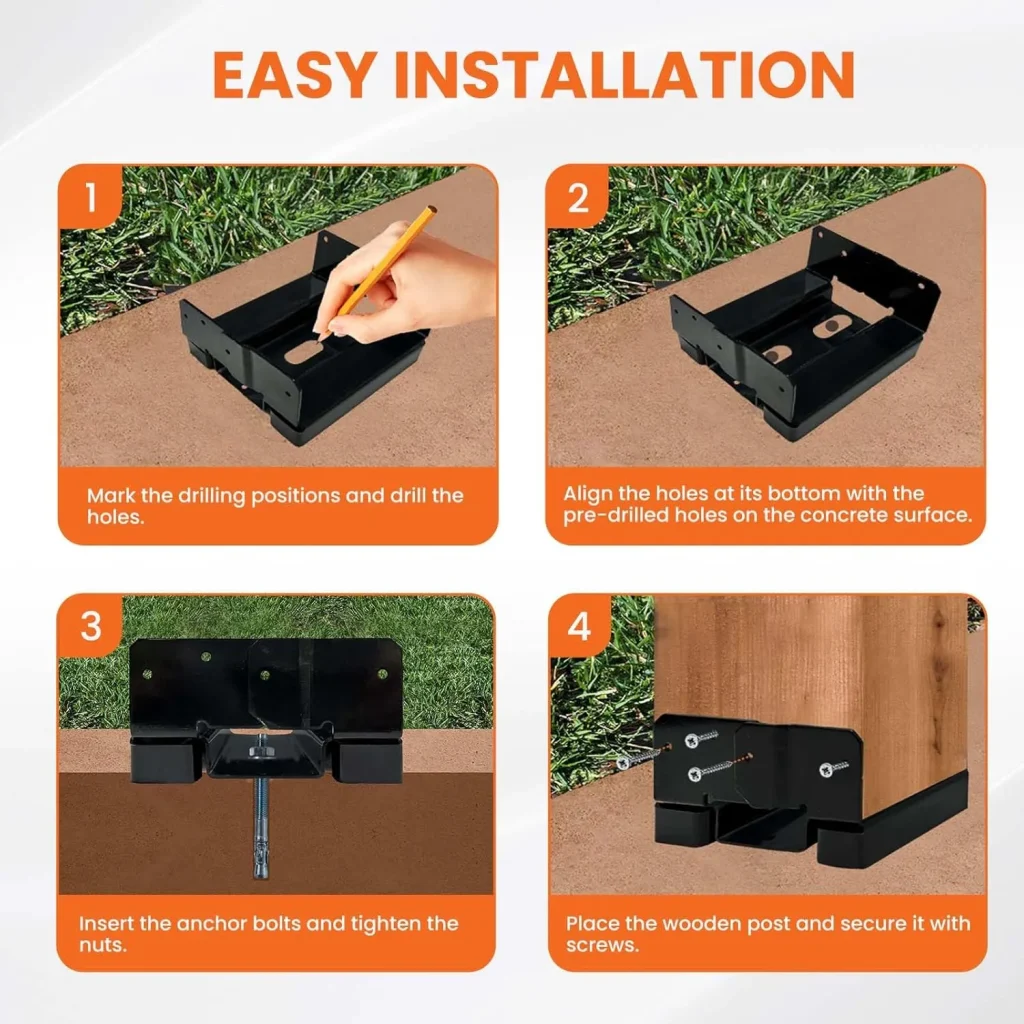
Installing a post base on concrete is a fairly straightforward job when you have the right base, anchors, and tools. The basic process is simple: position the base, mark the holes, drill into the concrete, install the anchors, and secure the wood post.
However, a good installation starts before you pick up the drill. You need to make sure the post base matches the actual size of your wood post and that the concrete can handle the planned connection.
This guide walks through how to install a post base on concrete, from choosing the right size to securing the post.
Note: This guide covers general installation steps. Always follow the instructions supplied with your specific post base and anchor hardware. For load-bearing or structural applications, follow your project plans and local building requirements.
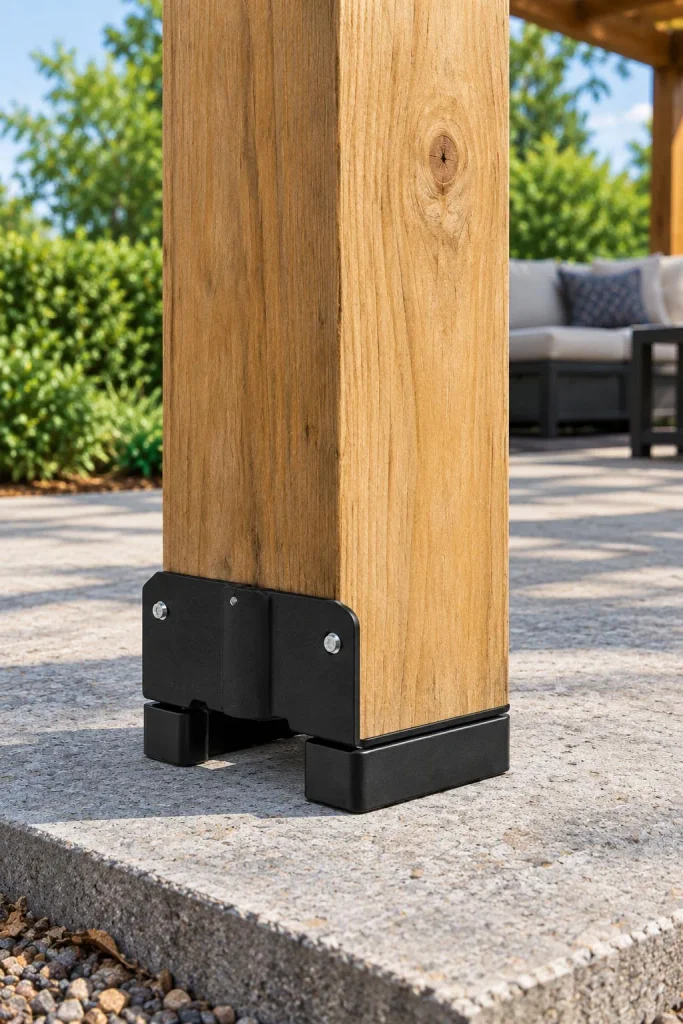
Before you start, gather the post base, wood post, concrete anchors, and basic tools.
Depending on your post base and anchor type, you may need:
You may also need a vacuum or brush to clean dust from the drilled holes.
The exact anchor size and installation method depend on the post base and the concrete. Do not assume that every post base uses the same anchor. Check the hardware supplied with your product before drilling.
Before you start, gather the post base, wood post, concrete anchors, and basic tools.
Depending on your post base and anchor type, you may need:
You may also need a vacuum or brush to clean dust from the drilled holes.
The exact anchor size and installation method depend on the post base and the concrete. Do not assume that every post base uses the same anchor. Check the hardware supplied with your product before drilling.
Start with the wood post, not the bracket.
A nominal 4×4 post typically measures about 3.5″ × 3.5″ after finishing. A nominal 6×6 usually measures about 5.5″ × 5.5″.
The same idea applies to larger posts.
| Nominal Post | Typical Actual Size |
|---|---|
| 4×4 | 3.5″ × 3.5″ |
| 6×6 | 5.5″ × 5.5″ |
| 8×8 | 7.5″ × 7.5″ |
| 10×10 | 9.5″ × 9.5″ |
| 12×12 | 11.5″ × 11.5″ |
Measure your post before ordering the hardware. A few minutes with a tape measure can save you from buying the wrong size.
If you’re still comparing sizes, see our guide to 4×4 vs 6×6 post base for a closer look at the difference.
Before installing the base, take a close look at the concrete where the post will sit.
The surface should be reasonably flat, solid, and suitable for the anchors you plan to use.
Check for:
If the concrete is damaged around the mounting area, don’t simply drill through it and hope for the best. The condition of the concrete affects how well the anchors can hold.
For a structural project, follow the requirements in your building plans or consult a qualified professional.
Place the post base on the concrete where you want the post to stand.
Take a moment to check the position from several angles.
For a pergola or deck, make sure the base lines up with the other posts and the overall layout. If you’re replacing an existing post, use the original location only if the concrete and structure are still suitable.
Once you’re happy with the position, mark the mounting holes on the concrete.
Don’t rush this step. It is much easier to move a bracket before drilling than after.
With the post base in position, use a pencil or marker to mark each hole.
Then remove the base from the concrete.
Before drilling, double-check the marks.
Measure the spacing if necessary and make sure the holes won’t land too close to an edge or damaged section of concrete.
This is also a good time to check the anchor instructions. Different concrete anchors have different requirements for:
Use the dimensions specified for your anchor rather than guessing.
Now it’s time to drill the anchor holes.
Use the correct masonry or concrete drill bit for your anchor. Keep the drill steady and drill to the depth specified by the anchor manufacturer.
Wear safety glasses during this step. Concrete drilling creates fine dust and debris.
Keep the drill straight.
Angled holes can make it harder to install the anchors correctly.
Don’t stop too early.
The anchor needs the correct hole depth to work as intended.
Control the dust.
Dust left inside the hole can interfere with some anchor types.
Don’t force the drill.
Let the bit do the work and use the drilling mode recommended for your equipment.
After drilling, remove the concrete dust from each hole. A brush, vacuum, or other method specified by the anchor manufacturer can help.
Place the post base back over the holes.
Then install the concrete anchors according to their instructions.
Depending on the anchor type, this may involve:
Don’t overtighten the hardware just because the base feels secure.
Some concrete anchors have specific torque requirements. Follow the instructions supplied with the anchors.
Once the anchors are installed, check the post base again.
It should sit firmly against the concrete without rocking.
Before putting the wood post into the base, check the connection one more time.
Look at the base from the side and make sure it sits correctly.
If your post base has an elevated design, the bottom of the wood post should remain above the concrete surface.
For example, some EONECROSS post bases use a 1-inch standoff. This creates space between the bottom of the wood post and the mounting surface.
That gap helps limit direct contact between the wood and concrete. However, it does not replace proper drainage, sealing, or weather protection.
Place the wood post into the installed base.
Make sure it sits fully inside the bracket and lines up with the mounting holes.
At this point, use a level to check the post.
Check it from two directions:
Adjust the position until the post is properly aligned.
If you’re installing several posts for a pergola or deck, check their alignment together. A small error in the first post can become much more noticeable as you add the remaining posts.
Once the post is positioned and leveled, secure it to the post base using the specified fasteners.
The exact fastener type depends on the design of the post base.
Follow the product instructions rather than replacing the supplied hardware with whatever screws happen to be in your toolbox.
After tightening the fasteners, check the post again with a level.
If necessary, make small adjustments before completing the connection.
A 4×4 post base is typically used with a nominal 4×4 wood post measuring about 3.5″ × 3.5″.
The installation process is the same:
For a smaller pergola, deck, porch, or similar project, a 4×4 post base can provide the post-to-concrete connection specified by the project design.
If you need one for a nominal 4×4 post, see the 4×4 post base for concrete.
The same basic process applies to a 6×6 post base.
A typical nominal 6×6 wood post measures about 5.5″ × 5.5″, so make sure the base matches that actual dimension.
A larger post base also needs enough room on the concrete for its mounting holes and anchors.
Before drilling, check the complete layout and make sure the anchor positions work with the available concrete.
For a 6×6 post connection, see the 6×6 post base for concrete.
The installation principle doesn’t change much as the post gets larger. However, the actual post dimensions and mounting requirements do.
For example:
Don’t assume that a larger post automatically fits a larger base.
Measure the actual post and check the product specifications before installation.
For a broader comparison, you can also read our post base size guide covering 4×4, 6×6, 8×8, 10×10, and 12×12 posts.
The answer depends on the specific product.
A raised post base creates a gap between the bottom of the wood post and the concrete surface. This is commonly called a standoff.
A 1-inch standoff, for example, raises the bottom of the post about 1 inch above the mounting surface.
The purpose is simple: keeping the end of the wood away from direct contact with the concrete can help limit moisture exposure.
Still, don’t treat the standoff as a complete moisture-control solution.
Good drainage, suitable lumber, proper sealing, and regular inspection all matter for outdoor wood structures.
Yes, a post base can be installed on existing concrete when the slab or footing is suitable for the intended connection.
However, the condition of the concrete matters.
Existing concrete may have:
Before drilling, make sure the planned anchor locations are suitable.
If you’re working with an important structural connection, check your local requirements and project specifications before proceeding.
A nominal 4×4 and actual 3.5″ × 3.5″ are not two different posts. The first is the nominal lumber size, while the second is the typical finished dimension.
Always measure.
Once you’ve drilled holes, moving the base becomes much harder.
Dry-fit everything first and mark carefully.
Dust can affect some anchor installations.
Clean the holes according to the anchor manufacturer’s instructions.
Don’t replace specified structural fasteners with whatever screws you already have.
Use the hardware recommended for the post base and concrete connection.
A post can look straight from one direction and still lean from another.
Check both directions before securing it.
A raised post base helps create separation from the concrete, but water still needs somewhere to go.
Keep the area around the post clean and well drained.
A few simple habits can make the job easier.
Check the post and base dimensions before drilling.
Put the base and post in position before making permanent holes.
A clear mark makes it easier to keep the drill exactly where you want it.
Concrete dust gets everywhere. Cleaning the holes and work area as you go also makes the installation easier to inspect.
Once everything is tight, adjustments become harder.
Anchor installation is not one-size-fits-all. Hole size, depth, cleaning, and tightening requirements can vary.
A: Yes, when the post base and anchors are designed for concrete installation and the concrete is suitable. Follow the manufacturer’s installation instructions and local requirements.
A: Most post bases designed for concrete require mechanical anchors or another specified connection method. That usually means drilling into the concrete.
A: Use the type and size of masonry or concrete bit specified for your anchor. The correct bit depends on the anchor design.
A: Drill to the depth specified by the concrete anchor manufacturer. Do not guess the depth based only on the length of the screw or bolt.
A: Yes. A suitable 4×4 post base can connect a nominal 4×4 wood post to a concrete surface when the base and anchors match the application.
A: Yes. A suitable 6×6 post base can be installed on an appropriate concrete surface using the specified anchors and fasteners.
A: A post base creates separation between the wood and concrete, which can help limit direct moisture contact. However, it does not guarantee that the wood will not rot. Drainage, lumber selection, sealing, and maintenance still matter.
A: Yes. The base should sit properly on the concrete, and the wood post should be checked for plumb before you complete the connection.
Learning how to install a post base on concrete is mostly about getting the small details right.
Choose the correct base for your actual post size. Check the concrete before drilling. Mark the holes carefully, use the correct anchors, clean the holes, and check the post from both directions before tightening everything down.
Don’t rush the drilling stage. Once the holes are in the concrete, you have much less room to correct a positioning mistake.
For a simple DIY project, taking a little extra time to measure and line everything up can make the rest of the installation much easier.
And if you’re still deciding which size to buy, start with the post. Measure the wood first, then choose the matching post base.